Showing posts with label Vintage quilling. Show all posts

Tuesday, September 5, 2017

Fall

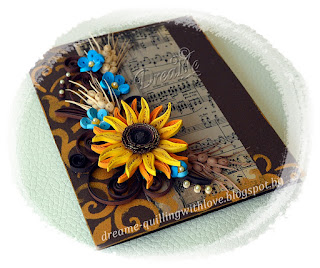
Here is my DT project for IQCG N 40 - "Fall" - create anything with Fall theme - it may be colours or anything that fits the fall theme and add quilling to your project.

So I made sunflower, wheat and forget - me -  nots: to remind me for the summer warmth ...


 The way I made wheat.

Monday, July 3, 2017

Hanging garden

Here it is my DT work for Indian Quilling Challenge N 38 "Mixed media - Textures and shine". 
I used some antique molded shapes, laying stencils to make the texture and 3 shades of blue. Finally I added some gun metallic sparkling dust and pearls.

Happy Quilling and painting and ... looots of imagination


Sunday, October 19, 2014

Dreaming & traveling ...


Paris ...
I had to make an anniversary card for a lady liking traveling. It should be gifted by eight families so I decided to provide a place for a personal note to all of them. That why I used an accordion card base. I wanted card to look romantic, a lil bit retro dreamy one and to content some kaleidoscope or cicle elements so I made some references to the four seasons - spring blossomed branch, lilac, chrysanthemums and snowflakes on the covers. Here's the result:


Трябваше да направя картичка за юбилей на дама, която обича да пътува. И тъй като ми споменаха, че ще се подарява от осем семейства, реших, че ще е добре за всяко от тях да има място за писане на пожелания.  И така се роди идеята за картичка хармоника.  В общи линии ми се искаше картичката да е мечтателна, романтична, леко ретро  и  да е като някакъв калейдоскоп или кръговрат, затова реших да направя препратки към четирите годишни времена - цъфнало пролетно клонче, люляк, хризантеми и снежинки на кориците. Ето резултата:

First cover:

Second cover:

Inside 1:

Inside 2:

Working process:


Thursday, February 6, 2014

Bottle decoupage tutorial

Because many of my friends here asked me to show how did I make this bottle and inspite I m quite new in decoupage I ll try to explain.
1. First step is to remove all original labels from the bottle very clearly and dry it.
2. Second step - If  you wanna stick ur own labels prepare them /I used distress inks shown on the pic below/ in advance and fully spread a glue on the back side of the label. I use PVA glue+lil water to make it more liquid and to make paper label wet. Then apply the label on the bottle and cover it with this glue again trying to remove all airy bubbles behind the label, starting always from the centre to the ends of label. Wait all this to dry fully.
3. Third step: Cover the whole bottle with "Medium" - it is some kind of liquid which is a lil bit adhesive /it is white color but when dry becomes transparent/. This is absolutely necessary to apply on the bottle before next step because the glass is quite smooth and the plaster will not stick on it tightly otherwise. Wait to dry again.


4. Forth step - Apply with a knife or spatula the plaster in any form you wish - wait to dry. I wait more than 12 hours between steps to be sure all has dried.


5. Fifth step - Apply the plaster with a nozzle ended plastic bottle from already used hair dye in such shapes and curves as you want. Again dry procedure.

6. Sixth step: Cover all plaster areas with black acrylic paint - wait to dry again :) I use a piece of sponge for this.

7. Seventh step: Cover some areas with silver or gold or any old looking paint to achieve this ancient metal look. Drying again and again

8. Final step: Polish whole bottle twice or even 3 times /I use water based varnish for wood/- so that's it.

Stuffs I used:

Sunday, December 1, 2013

Jewelry box

There is a tradition in one craft group, where I m a member, to exchange some presents for Christmas. We know only to whom we shall send our works, but have no idea who will send to us. So I though a lot what to make and finally I decided to make a box with monogram on it.
I made the box from thick 1.5 mm cardboard and coloured it with distress inks. Then I embossed it with silver embossing powder. All edges I coloured with silver acrylic paint using my fingerrrrr.  At the end I polished whole box with water  based varnish, because distress inks are not water proofed.After all these procedures - quilling time :D. So here it is the result:

В една крафтърска група, на която съм член, има традиция да си разменяме коледни подаръци като знаем само на кого имаме да подаряваме, а кой ще подарява на нас е изненада. Много се чудих какво да направя и накрая реших да е кутия - за бижута, за снимки, за писма или просто за сметки :). Направих я от бирен картон, който оцветих с дистрес мастила, После я ембоснах със сребърна пудра, и накрая минах по ръбовете с сребърна акрилна боя. И понеже дистрес мастилата не са водоустойчиви я лакирах с водоразтворим лак. След всичко това дойде време за квилинг частта. Ето го резултата:


All stuffs I used to make it/материалите, които съм използвала:

Sunday, November 10, 2013

Vintage framed icon


Една приятелка ми беше подарила икона, на която планирах да направя обков с квилинг в стил Винтидж или античен квилинг. За целта използвах три цвята лентички - екрю, праскова и кафяво. Минах по ръбовете на лентите с акрилна боя сребро, използвайки тампон. Основата направих от бирен картон, който "стреснах" с дистрес мастила.

This icon I received as a gift from a friend and I t planed  to make it with silver repousse cover in  Vintage or Antique Quilling style. I use three colors strips - champagne, peach and brown. I coloured the edges of the strips with silver acrylic paint, using a swab. The base is made ​​from cardboard, which I distressed with  distress inks.

Ето какво излезе:


Събрах кураж за първи път да участвам в Хомячок Challenge Квилинг задание № 10 Завитки и спечелииииих :D :D :D